添加插件hugo-notice

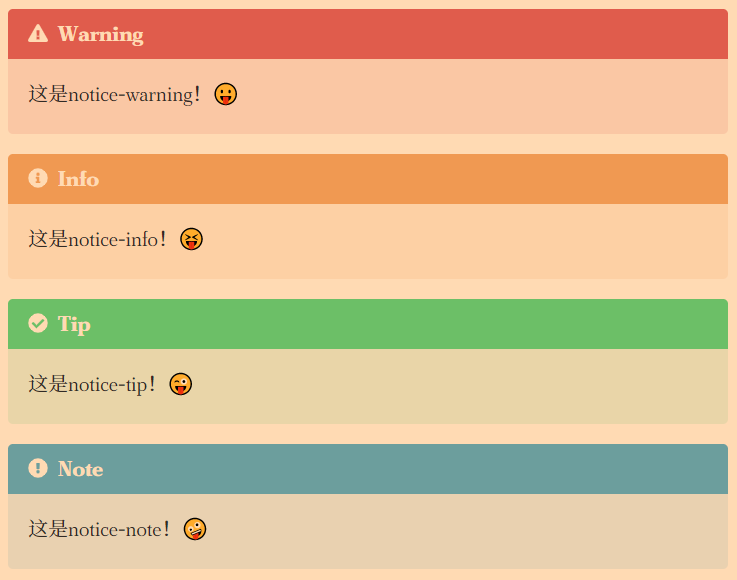
添加的hugo-notice插件效果如下:

代码截图

接下来就是展现添加这款插件的方法了!

首先了解 Hugo主题组件
通过主题组件你可以在 Hugo 中同时使用多款主题,这样的好处是你可以添加别人写好的一些短代码
如此便把短代码所具有的功能添加到你的博客中。hugo-notice 便是这样的一个主题组件。

然而,我并非是使用这种方法添加的 hugo-notice 插件。🙃

亲身实践:进入 hugo-notice,按照提示在根目录下执行 git submodule add https://github.com/martignoni/hugo-notice.git themes/hugo-notice。然后 themes 文件夹中便出现了 hugo-notice 主题,接着再根据提示把站点配置文件config.yaml(或则是config.toml)中有关 theme 一项加上该主题hugo-notice

Example, with config.toml:

1
theme = ["hugo-notice", "your-theme"]

执行上述步骤后的确能使用该插件,但是效果不尽人意(和它在页面上贴出来的效果相差甚远)😂。
而我发现荷戟独彷徨大佬的文章中使用该标签插件的效果的确很好,于是我打开控制台,发现我博客 notice 部分相较来说少了些东西,进入 hugo-notice 中的 notice.html 查看,发现安装的插件配置有些问题,我尝试改了一下,但由于是小白,很快就放弃了😶。
于是我便前往大佬的 github 仓库找相关文件配置,几番搜寻下,终于找到有关文件。小白就需要这样的大佬😁!

总结步骤如下:(我使用的为 meme 主题,其它主题按原理操作即可)

Hugo 有个特点:灵活,你可以直接在根目录下命名有关文件,加入相关内容来自定义相应布局模板,而不用去修改主题的配置文件。

先在站点目录中的 layouts 下新建 shortcodes文件夹,再放入align.html以及notice.html两个文件。

align.html内容:

1
2
<!--repalce custom content to hugo shortcode-->
<p style="text-align:{{ index .Params 0 }}">{{ index .Params 1 | markdownify }}</p>

notice.html内容:

1
2
3
4
5
6
7
8
9
10
11
12
13
14
15
16
17
18
19
20
21
22
23
24
25
26
27
28
29
30
31
32
33
34
35
36
37
38
39
40
41
42
43
44
45
46
47
48
49
50
51
52
53
54
55
56
57
58
59
60
61
62
63
64
65
66
67
68
69
70
71
72
73
74
75
76
77
78
79
80
81
82
83
84
85
86
87
88
89
90
91
92
93
94
95
96
97
98
99
100
101
102
103
104
105
106
107
108
109
110
111
<!--https://github.com/martignoni/hugo-notice-->
<!--change notice color-->
{{- $noticeType := .Get 0 -}}

{{- $raw := (markdownify .Inner | chomp) -}}

{{- $block := findRE "(?is)^<(?:address|article|aside|blockquote|canvas|dd|div|dl|dt|fieldset|figcaption|figure|footer|form|h(?:1|2|3|4|5|6)|header|hgroup|hr|li|main|nav|noscript|ol|output|p|pre|section|table|tfoot|ul|video)\\b" $raw 1 -}}

{{- if not ($.Page.Scratch.Get "noticeCount") -}}

<style type="text/css">
.notice-icon {
margin: 0 0.5em 0.3em 0;
}

.notice {
padding: 1em;
margin-bottom: 1em;
border-radius: 4px;
}

.notice p:last-child {
margin-bottom: 0;
}

.notice-title {
margin: -1em -1em 0.75em !important;
padding: 0.25em 1em;
border-radius: 4px 4px 0 0;
font-weight: 700;
color: hsl(0, 0%, 100%);
}

[data-theme="dark"] .notice-title {
color: hsl(0, 0%, 75%);
}

.notice.notice-warning .notice-title {
background: hsl(0, 65%, 65%);
}

[data-theme="dark"] .notice.notice-warning .notice-title {
background: hsl(0, 25%, 35%);
}

.notice.notice-warning {
background: hsl(0, 65%, 65%, 0.15);
}

[data-theme="dark"] .notice.notice-warning {
background: hsl(0, 25%, 35%, 0.15);
}

.notice.notice-info .notice-title {
background: hsl(30, 80%, 70%);
}

[data-theme="dark"] .notice.notice-info .notice-title {
background: hsl(30, 25%, 35%);
}

.notice.notice-info {
background: hsl(30, 80%, 70%, 0.15);
}

[data-theme="dark"] .notice.notice-info {
background: hsl(30, 25%, 35%, 0.15);
}

.notice.notice-note .notice-title {
background: hsl(200, 65%, 65%);
}

[data-theme="dark"] .notice.notice-note .notice-title {
background: hsl(200, 25%, 35%);
}

.notice.notice-note {
background: hsl(200, 65%, 65%, 0.15);
}

[data-theme="dark"] .notice.notice-note {
background: hsl(200, 25%, 35%, 0.15);
}

.notice.notice-tip .notice-title {
background: hsl(140, 65%, 65%);
}

[data-theme="dark"] .notice.notice-tip .notice-title {
background: hsl(140, 25%, 35%);
}

.notice.notice-tip {
background: hsl(140, 65%, 65%, 0.15);
}

[data-theme="dark"] .notice.notice-tip {
background: hsl(140, 25%, 35%, 0.15);
}
</style>

{{- end -}}

{{- $.Page.Scratch.Add "noticeCount" 1 -}}

{{ $icon := (replace (index $.Site.Data.SVG $noticeType) "icon" "icon notice-icon") }}
<div class="notice {{ $noticeType }}" {{ if len .Params | eq 2 }} id="{{ .Get 1 }}" {{ end }}>
<p class="first notice-title">{{ $icon | safeHTML }}{{- i18n $noticeType -}}</p>
{{- if or $block (not $raw) }}{{ $raw }}{{ else }}<p>{{ $raw }}</p>{{ end -}}
</div>

再进入根目录下的 i18n 文件夹(没有即可新建),放入zh.toml,若开启了多语言站点,如英语,可继续放入en.toml
两文件内容均为:

1
2
3
4
5
6
7
8
9
10
11
[notice-warning]
other = "Warning"

[notice-note]
other = "Note"

[notice-info]
other = "Info"

[notice-tip]
other = "Tip"

最后前往 data 文件夹,加入SVG.toml(已有即可直接加入下述代码)。SVG.toml内容:

1
2
3
4
5
# Notice Icon
notice-warning = '<svg xmlns="http://www.w3.org/2000/svg" class="icon" viewBox="0 0 576 512"><path d="M570 440c18 32-5 72-42 72H48c-37 0-60-40-42-72L246 24c19-32 65-32 84 0l240 416zm-282-86a46 46 0 100 92 46 46 0 000-92zm-44-165l8 136c0 6 5 11 12 11h48c7 0 12-5 12-11l8-136c0-7-5-13-12-13h-64c-7 0-12 6-12 13z"/></svg>'
notice-info = '<svg xmlns="http://www.w3.org/2000/svg" class="icon" viewBox="0 0 512 512"><path d="M256 8a248 248 0 100 496 248 248 0 000-496zm0 110a42 42 0 110 84 42 42 0 010-84zm56 254c0 7-5 12-12 12h-88c-7 0-12-5-12-12v-24c0-7 5-12 12-12h12v-64h-12c-7 0-12-5-12-12v-24c0-7 5-12 12-12h64c7 0 12 5 12 12v100h12c7 0 12 5 12 12v24z"/></svg>'
notice-note = '<svg xmlns="http://www.w3.org/2000/svg" class="icon" viewBox="0 0 512 512"><path d="M504 256a248 248 0 11-496 0 248 248 0 01496 0zm-248 50a46 46 0 100 92 46 46 0 000-92zm-44-165l8 136c0 6 5 11 12 11h48c7 0 12-5 12-11l8-136c0-7-5-13-12-13h-64c-7 0-12 6-12 13z"/></svg>'
notice-tip = '<svg xmlns="http://www.w3.org/2000/svg" class="icon" viewBox="0 0 512 512"><path d="M504 256a248 248 0 11-496 0 248 248 0 01496 0zM227 387l184-184c7-6 7-16 0-22l-22-23c-7-6-17-6-23 0L216 308l-70-70c-6-6-16-6-23 0l-22 23c-7 6-7 16 0 22l104 104c6 7 16 7 22 0z"/></svg>'

然后该插件即可正常使用!😝

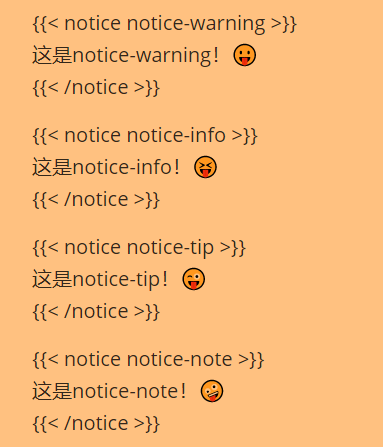
使用时加上下述相应代码(文本内容自行修改)即可:

代码截图

发现我只要输入上图相应代码,无论是否放在代码块中,都会被转化😹。于是便只放了张图。

Hexo 中 NEXT 主题可直接下载 Note 标签插件。
-------------------本文结束 感谢您的阅读-------------------
点击刷新